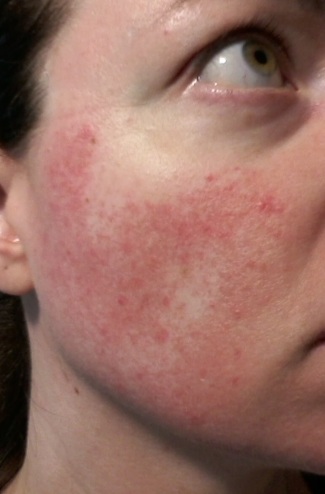
My first day using the red light therapy on my rosacea went well, I think. It’s hard to tell because I didn’t have any miraculous immediate results (not that I was expecting anything). But nothing got worse, so I consider that a great first day.
So many of the topical treatments that I’ve tried have caused flare-ups within the first few minutes, so it’s always nice when nothing devastating happens right off the bat.
Here are the steps I took for the first treatment using red light therapy for rosacea:
- Washed my face (I have been using Eucerin DermatoCLEAN Mild Cleansing Lotion for about 2 years and it seems to do the trick, except in getting sunscreen off…but that’s another story).
- Gently patted my face dry with a small, soft microfiber towel (I get mine at the dollar store so that I can have enough of them that I can toss them in the wash after each use. This helps to ensure that I’m never accidentally applying dirt, product, makeup, dust, or anything else unwanted to my clean face).
- Downloaded a kitchen timer app so that I’d be able to time the use of the red light therapy treatments on each “zone” of my face even with the goggles on.
- Set up my tablet within reach so that I could easily use the timer.
- Sat down in a comfortable position.
- Put on the “Super Sunnies” protective goggles.
- Started the timer.
- Shone the LED red light on my right cheek for a minute and a half (90 seconds).
- Shone it on the front of my face for a minute and a half.
- Shone it on my left cheek for 3 minutes (180 seconds).
That’s it!
Then I immediately took pictures of my cheeks:


As you can see, there really isn’t any difference between these pictures and my original “before” pictures, but I really wasn’t expecting something to happen immediately after a 90 second to 180 second treatment. My skin cells haven’t had time to do anything with all of that red light energy!
Alright, there is one difference (ugh!) a nasty red pimple that decided to appear on my chin overnight. That said, red light therapy is supposed to be good for acne, too, so I decided not to crop it out of the photo. So much for my pride! I’m hoping that I’ll remember to include my chin in the pics that I take over the next few days so we can watch the red light wavelengths nuke that thing right off my face, too!
The main reason that I’ve added the pictures is to show that it also didn’t make the rosacea symptoms any worse while using it. Also, I’m trying to practice taking selfies in a way that will be truer to the colour of the redness of my skin.
Clearly I still need work since the right side of my face looks like the light is more yellow than the white light that seems to be shining on me for the left side. I have no idea why that’s happening since I’m standing in the same spot, facing the same direction, using the same tablet for both shots. If you have any advice for taking pictures that will be truer to the red colour on my face, please feel welcome to share them in the comments below this post.
I do feel that it’s worth noting that it was a very calming experience. I just shut my eyes and did some slow breathing techniques (sometimes I like to pretend that I can meditate…I can’t). Other than that, it didn’t feel like anything. I’m not sure what I expected. I think I thought that it would feel warm. It didn’t. It just felt like a lot of red was shining on me, and that’s it.
We’ll see what happens overnight.
Other factors to be considered:
- The temperature high today was 22ºC (71ºF)
- The temperature low overnight was 10ºC (50ºF)
- I didn’t have any alcohol or spicy foods
- I didn’t spend more than 10 minutes in direct sunlight at a time, today.

[…] (click here to see the pics I took on the first day of treatment – What a difference!) […]
LikeLike